Authoring With Course Cafe
By Administrator
First published on April 26, 2019. Last updated on June 16, 2024.
Authoring With Course Cafe
By Administrator
First published on April 26, 2019. Last updated on June 16, 2024.
Table of Contents
- Preface for Instructors and Authors
- 1 Getting Started
- 1.1 Creating Your First Course
- 1.2 Changing the Order of Lessons in a Course
- 1.3 Content Entry Fields and Buttons
- 2 Universal Design and Accessibility
- 3 Special Content Types
- 3.1 Images and Videos
- 3.2 Files
- 3.3 Tables
- 3.4 Color-Shaded Boxes
- 3.5 Alert Messages
- 3.6 Short Codes
- 3.7 Hidden Text
- 3.8 Mathematics
- 3.9 Computer Code
- 3.10 Quizzes
- 3.11 Embedding Other Content
- 3.12 Optimizing For Print or Display
- 4 Advanced Styling Tools and Techniques
- 5 Special Topics
- 6 Editors
- 7 Administrators
- Appendix: Text Editor Quicktags and Codes
This manual describes how to author with Course Cafe. Authoring with Course Cafe is similar to composing in a word processor such as Microsoft Word. In fact, much of the time it will be simpler. You will just type and use a few tools. However, there some differences and and added complexity concerning how to build a course with multiple lessons and to publish it in multiple forms.
Course Cafe is built upon WordPress. There are many online general training tutorial for WordPress if you want more information than this site’s documentation provides. However, even if you already know how to use WordPress, you should still read this site’s instructions, because significant additions and changes and been made.
-
Preface for Instructors and Authors
First published on May 11, 2019. Last updated on May 11, 2019.
Authoring With Course Cafe is intended as a tutorial, guide and reference for instructors and authors who create content on Course.Cafe.
An introduction regarding how to create a course and lesson is provided. These provide the basic skills to create content on the platform. If you just type text, for example for a law or literature course, this might be all that you need.
If you already know WordPress, then much will be familiar. Although Course.Cafe is focused upon creating textbooks, it is also possible to create posts and allow commenting. For those who are unfamiliar with WordPress, a description of the editing fields is provided.
However, there is much that has been added beyond standard WordPress, and some that is entirely new. Much of the rest of this authoring course discusses how to handle special content such as formulas.
As an educator or authors, it is expected that accessibility will be important. How to improve accessibility as well as principles of universal design are discussed, and additional resources are listed.
-
1 Getting Started
First published on . Last updated on May 11, 2019.
We will get started with learning how to Author on Course.Cafe with a brief introduction how to create a course and lesson. Of course you can create many courses and attach many lessons to each course, once you know how to set up one of each. Then a description of the editing fields will explain things further.
-
1.1 Creating Your First Course
First published on April 30, 2019. Last updated on August 24, 2024.
Instructions for creating a course with lessons
- Go to Dashboard. On the left hand side menu, hover over over Courses and click on Add New.
- You should be taken to a new page to enter your course. Under the Edit Course label, enter the course title and and desired content.
- Then in the upper right hand corner, click Save Draft. (You can save as often as you wish). To make the course publicly available, click Publish.
- On the left hand side menu, hover over over Lessons and click on Add New.
- Add the Lesson title.
- Enter some content into the large field in your Lesson’s entry view, below the Add Media button and text editing tools.
- If you want to attach your lesson to a course, choose the course name in the Related Course list.
- Then, in the upper right hand corner, click Save Draft. However, the lesson will not appear on the course page until you click Publish.
- On the left hand side menu, hover over over Courses and click on All Courses.
- When you see a list of courses, then hover just under your course’s title and click on the Edit link.
- You can preview your courses or lessons at any time.
- To view the course as a student or other reader, click on the link to the right of “Permalink:” beneath the title.
Editing your a course and lessons
As a Course Cafe author, you can go back and edit your courses and lessons at any time. Just go to the Course list or Lessons list, and click Edit beneath the content item title. Remember save your work by clicking the relevant button, which might be Save Draft, Update, or Publish, all in the upper right hand corner in the Publish pane.
Suggestion: first create a list of your planned lessons. The create the lessons in reverse order of the order for them to be read. They will then appear in your desired order for readers. If you ever need to change the order, please contact the Course Cafe administrator.
Caveat: if you change your course title, you will need to change it in each of the lessons for that course.
Backing Up Your Contents
You should periodically back-up your course by periodically generating a PDF of your course. This is accomplished by clicking the Print book for this course button on the course page. Back-ups are made of the entire Course Cafe site, the the availability of such back-ups cannot be guaranteed.
Setting up course navigation and searchability
You can go ahead and create a course on your own. Linked titles for all of the lessons for the course should appear on the course page. However, once a reader is in a lesson, there may be additional set-up required for the links to and previous and next lesson to work as desired. The first step is to contact the administrator to set up a category for your course. It could have the same title as your course. However, it does not have to have the same title, but it should be different from any existing category.
Once the category is set up, then select it for any lesson that you wish to appear in the footer navigation. However, do not select a category if you wish to omit it from footer navigation. For example, you might wish to have break-out lessons for students who need extra practice or background, but which would not be appropriate for all of your students.
Accessibility
To maximize the impact of your content, you should make it accessible to a range of users with diverse abilities, backgrounds and devices. Further, some organizations require content to be accessible per various standards. For further information, see Accessibility and Universal Design.
-
1.2 Changing the Order of Lessons in a Course
First published on July 20, 2019. Last updated on July 20, 2019.
To change the order of lessons in a book:
1. go to Lessons in the left hand menu.
2. Choose the name of the desired related course.
3. Click the Filter button.
4. Drag lessons in the desired order.
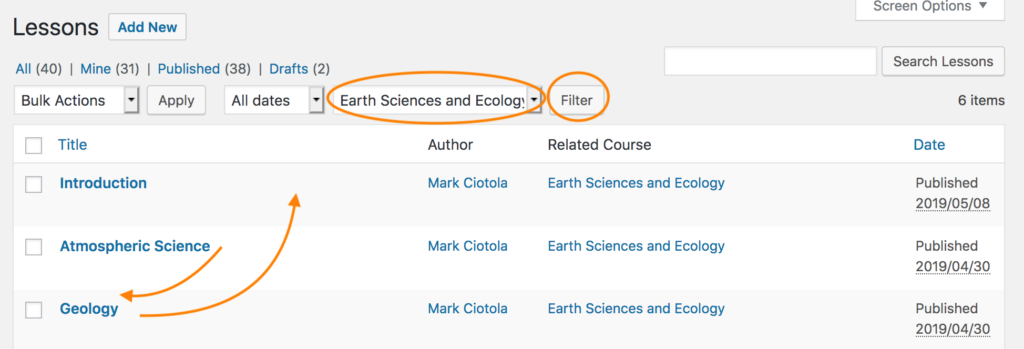
Filter then drag lessons to re-order them for a course
Warning: you can drag lessons in an unfiltered list, but the changed order will not show up in the course order.
-
1.3 Content Entry Fields and Buttons
First published on April 30, 2019. Last updated on May 11, 2019.
(Excerpts below taken from WordPress.org.)
Title/Headline Box
The title of your post. You can use any phrases, words or characters. Avoid using the same title twice as that will cause problems. You can use commas, apostrophes, quotes, hyphens/dashes and other typical symbols in the post like “My Site – Here’s Lookin’ at You, Kid”. WordPress will then clean it up to generate a user-friendly and URL-valid name of the post (also called the “post slug”) to compose the permalink for the post.
Body Copy Box
The blank box where you enter your writing, links, links to images, and any information you want to display on your site. You can use either the Visual or the Text view to compose your posts. For more on the Text view, see the section below, Visual Versus Text View.
Preview button
Allows you to view the post before officially publishing it.
Publish box
Contains buttons that control the state of your post. The main states are Published, Pending Review and Draft. A Published status means the post has been published live on your blog for all to see. Pending Review means the draft is waiting for review by an editor prior to publication. Draft means the post has not been published and remains a draft for you. If you select a specific publish status and click the update post or “Publish” button, that status is applied to the post. For example, to save a post in the Pending Review status, select Pending Review from the Publish Status drop-down box, and click Save As Pending. To schedule a post for publication on a future time or date, click “Edit” in the Publish area next to the words “Publish immediately”. You can also change the publish date to a date in the past to back-date posts. Change the settings to the desired time and date. You must also hit the “Publish” button when you have completed the post to publish at the desired time and date.
Publish box
Visibility – This determines how your post appears to the world. Public posts will be visible by all website visitors once published. Password Protected posts are published to all, but visitors must know the password to view the post content. Private posts are visible only to you (and to other editors or admins within your site)
Save
Allows you to save your post as a draft / pending review rather than immediately publishing it. To return to your drafts later, visit Posts – Edit in the menu bar, then select your post from the list.
Publish
Publishes your post on the site. You can edit the time when the post is published by clicking the Edit link above the “Publish” button and specifying the time you want the post to be published. By default, at the time the post is first auto-saved, that will be the date and time of the post within the database.
-
2 Universal Design and Accessibility
First published on . Last updated on May 16, 2019.
Good design tends to be accessible by a diverse a range of users, including users with visual and other impairments. This approach is called Universal Design. Further, many schools and organizations require materials to be accessible by all students. While this page won’t cover everything, it will provide some suggestions to improve accessibility.
Color and Contrast
Some students are color blind. They can’t differentiate between reds and greens. So avoid pure red or green, or make the colored content clearly differentiable. For example, instead of using red and green check marks, you could wither use blue or orange ones, or use a different symbol for each case.
Some students can’t read low contrast content. For example, black lettering upon a dark blue background might not be readable. So make certain to include a sufficiently high contrast.
Image Alternative Text
The visually-impaired often cannot perceive images. This can be somewhat mitigated by including a description in the Alt Text field for the media (see the metadata fields for media items in the Media Library). Alt Text should not merely repeat the caption. It should add descriptive information for those who cannot see the image. For example, the alt text for a volcano could be “pointed mountain with smoke puffing out of top”.
Captioning
To help audio-impaired persons, videos should ideally be captioned. There are several services who will do this as well as software that allows you to enter such. An alternative that might be sometimes acceptable is to provide a transcript of the video that includes some description of visual elements.
Captioning can also be very helpful to readers whose primary language is different than that of the speakers in the video, or to those accustomed to a different accent.
Interactive Content
Interactive content, such as embedded or linked Javascript applets, can be a challenge for the impaired to fully use, and often don’t even work in all platforms for any users. You should provide an alternative for interactive content just in case it won’t work for some users.
Responsive Design & Mobile Devices
These days, people view content on numerous types of devices and platforms, from giant monitors to tiny smart phone screens. It can be a challenge to create content that works well with all of the possibilities. This is called responsive design. Steps can be taken to improve responsiveness.
Course.Cafe itself has been tested on various platforms, and has been designed to be somewhat responsive. The layout is designed to display differently on large versus small screens. However, there is still work to do. Course.Cafe will strive to further improve responsiveness.
However, the biggest challenges that you as an author may encounter is that some embedded content itself is not responsive. You can sometimes improve responsiveness through the following measures:
- if an image, try setting a smaller image size.
- if a video, try a different video window size.
- sometimes scroll bars can be turned on for special content
- iframe (shortcode) can sometimes give you control over embedded media that can’t be obtained otherwise.
Also, obviously some content will not display well (or at all) in a PDF (especially when read offline), or when the PDF is printed on traditional paper. Please see Optimizing For Print or Display to improve content for PDF and print responsiveness.
Further Reading
- Universal design (Wikipedia)
- Web Content Accessibility Guidelines (WCAG)
- How to Write Alt Text and Image Descriptions for the visually impaired (Perkins)
- Image ALT Text includes examples of how to write Alt Text(Pennsylvania State University)
-
3 Special Content Types
First published on . Last updated on August 24, 2024.
There are many special content types that you can include in Course Cafe lessons. (It may be possible to embed them in course descriptions as well, but doing so might be distracting from the natural flow of viewing the course or book.) Types include images, videos, files, tables and several other types. Several of these types will be covered in the following sections..
-
3.1 Images and Videos
First published on May 11, 2019. Last updated on May 16, 2019.
Images
You can often just copy and paste images into your Course.Cafe content. However, the preferred way is to first click on the Add Media button and upload the image into the Media Library, then insert it into your content. Make sure to enter the metadata including Alt Text to improve accessibility. You should enter the source and copyright information into the Description field.
GIF, JPEG (JPG) and PNG image files work best. Some other types might not work or might not display on older computers or browsers.
You can often choose a size for the image in its edit menu after you add it to a course or lesson. If none of the sizes is what you want, choose the smallest image size that is larger than your desired size, then decrease that size to what you desire. (You can drag to resize.) Decreasing the size of a larger image will improve image display quality.
Videos
Use the same approach for videos as for images. You might need to manually add your own caption in the content field rather than in metadata. There is no Alt Text field for videos, but ideally there should be captioning.
- TIP! To avoid videos appearing in the print version of your course, embed videos in the following short codes: [iframe class="noprint" src="your source"]] and [[/iframe]. The “scr” refers to the URL of the video, and “class” tells the video not to appear in the print version (which would show up as a blank space).
MP4 videos files are best to use. Other types might not appear on all browsers.
-
3.2 Files
First published on . Last updated on May 11, 2019.
Sometimes you will want to upload files for readers to download, such as a text document, spreadsheet, etc.
Sometimes Course.Cafe might reject your file. Sometimes this is to avoid security risks. Many documents can contain malware. Compressing these files into a ZIP file makes them both easier to download and safer.
- If just one file, then zip (compress) that file.
- If multiple files, place the files in a folder, then zip (compress) the folder.
- Upload the zip file.
-
3.3 Tables
First published on . Last updated on February 7, 2026.
Course.Cafe provides several approaches for including tables in content. That said, it may be a challenge to get the formatting just right. So you might have to tweak and experiment to get things to appear more desirable.Editing toolbar table creation tool
There is a table creation tool in the text editing tools toolbar. If that tool is insufficient, you can enter HTML and CSS in using the Edit tab. Below is an example of a table created by the Table tool.Various Edible Plants Type Variety Color Fruit Banana Yellow Vegetable Eggplant Purple Table short code
You can also use [table]…[/table] short codes, with values in between, e.g.
[table]
Year,Make,Model,Length
1997,Ford,E350,2.34
2000,Mercury,Cougar,2.38
[/table]which will produce a table such as:
! Note: this function is currently being replaced.
Creating a table with HTML and CSS
You can enter the Text mode and use HTML and CSS to manually create a table. An example of an HTML and CSS table is:
Year Make Model Length 1997 Ford E350 2.34 2000 Mercury Cougar 2.38
-
3.4 Color-Shaded Boxes
First published on May 12, 2019. Last updated on May 12, 2019.
To create boxes, you can use any of the following snippets. For example to style a gray box with a border, enter <p class=”box-gray-w-border”>Your paragraph.</p>. You have the following choices:Boxes With Borders
class=”box-gray-w-border”class=”box-lavender-w-border”class=”box-orange-w-border”Boxes Without Borders
class=”box-gray”class=”box-lavender”class=”box-blue”class=”box-yellow”class=”box-orange”
-
3.5 Alert Messages
First published on . Last updated on May 12, 2019.
You can add a message or alert the will popup as soon as a reader goes to a page, such as a course or lesson. Use the sheetmessage short code:
[sheetmessage message="Turn in Assignment #1!"]
Use the message parameter to enter the text for your message.
Alert messages can quickly get distracting and annoying, and may affect accessibility, so they should be used sparingly.
-
3.6 Short Codes
First published on . Last updated on May 12, 2019.
Course.Cafe is built on top of the WordPress open source software. It is possible to add additional functionality in WordPress using small snippets of code called shortcodes. Short codes are enclosed in “[…]” and “[/…]” punctuation. An example which will hide enclosed contents is:
[hide]This is my secret text[/hide].Many standard WordPress short codes will work on Course Cafe, as well as additional ones. Some short codes accept parameters.Some short codes can be used singly, such as:- [sheetmessage message="Turn in Assignment #1!"]
Other short codes are used in pairs to either enclose content or an error message. Examples include:- [hide] content … [/hide]
- [table] content … [/table]
- [simplecode color="Azure"] content … [/simplecode]
- [[noprint] content … [/noprint]]
- [[pdfonly] content … [/pdfonly]]
- [video]Your browser cannot display this content. [/video]
- [iframe]Your browser cannot display this content. [/iframe]
How to use these short codes is covered in their relevant sections.
-
3.7 Hidden Text
First published on . Last updated on May 12, 2019.
You might wish to use hidden text for notes to yourself or an editor, or for content that is not ready to be viewed by the public. As indicated above, place your content between the short codes.
[hide]This is my secret text[/hide].
For obvious reasons, no example is shown.
Warning! No guarantee is made that this hidden text won’t sometimes be visible to the public. For example, there could be a system bug or glitch that might temporarily deactivate all short codes. Or, you might make an entry mistake or omit the closing short code.
-
3.8 Mathematics
First published on . Last updated on May 12, 2019.
Direct Editing Approach
You can directly type some mathematics using the existing text editing tools, such as E = mc2. You can also use the Ω text tool to enter special symbols, such as ½, Ψ and π.
Inserting Images of Formulas
You can insert images that show equations, such as from a photographed white board or from screenshots.An advantage of this approach is that formulas in such images can be annotated.
However, be aware that this approach might be difficult for the visually-impaired to read. If so, make sure to enter an alternative text.
LaTeX
If you know LaTeX, then you insert LaTeX code between the following short codes:
[latex]Your LaTeX code [/latex].
Here are some examples that may be useful.
[latex]E = mc^2 [/latex]:
\(E = mc^2 \).
[latex]E = \frac{1}{2}mv^2[/latex]:
\(E = \frac{1}{2}mv^2\).
-
3.9 Computer Code
First published on April 30, 2019. Last updated on May 12, 2019.
There are several formatting options for computer code.Each approach has a different look, features, advantages and disadvantages. While you have several choices, you should try to use the options consistently within a course. (Be warned that some types of code will produce problematic results, so test everything in preview before publishing.)
Preformatted Text
The simplest approach is to use the Preformatted option under the text type menu. This will produce monospaced code. You can add shading by going to the Text tab. You will see your code contained in pre elements. You can add a Corsbook style, such as class=”box-lavender”, by adding the class in the pre element such as:
<pre class="box-lavender">
to place the code within a shaded box for gentle emphasis. For example:
# My ruby program
# Greet user
    puts "Hello"
# Do some math
    x = 1
    puts x
# Set a string variable
    myname = 'mark'
Enlighter
Another method is via the Enlighter utility. Use the Code Insert tool in the editing toolbar. Enlighter will sometimes protect against problematic code and sometimes preserves the indentation better. You can choose the language for semantic formatting. You can highlight lines of code turn line numbers on and off. After you create a code block, you can then change its appearance (theme) and other settings by hovering over the code and clicking on the pencil tool. A simple sample is below.
# My ruby program
# Greet user
    puts "Hello!"
# Do some math
    x = 1 + 2
    puts x
# Set a string variable
    myname = 'mark'
Code Shortcode
Finally, you can enclose the lines of code in short codes, such as: code … /code. You can specify some of the most common languages using this format: code lang=”ruby” …/code.
Remember to use “[” and “]” around your short codes. Line numbers will be displayed along with some syntax coloring. A list of supported languages and other information can be found at Syntax Highlighter Evolved support page. Here is an example of code formatted using the last option:
# My ruby program
# Greet user
puts "Hello!"
#Do some math
x = 1 + 2
puts x
# Set a string variable
myname = 'mark'
Simplecode Shortcode
Yet another approach is to use the simplecode shortcode. You can simpley type simplecode … /simplecode, or you can specify a background color, for example, simplecode color=”Azure” Your content… /simplecode.For example,
[simplecode color="Azure"]Your content… [/simplecode].
You should use light background colors. Examples of light background colors include Azure, AliceBlue, BlanchedAlmond, Cornsilk, FloralWhite, Gainsboro, HoneyDew, Lavender, LavenderBlush, LemonChiffon, MistyRose and SeaShell. See the W3Schools Color Picker for further choices. If you don’t include a color choice, the default is lavender. Below is an example using the color Azure:
# My ruby program
    puts "Hello!"
#Do some
    math x = 1 + 2
    puts x
# Set a string variable
    myname = 'mark'
Running Code Inside of a Lesson
None of the above options will run computer code from within the browser window. Some such utilities exist, but use them at your own risk. Some will not work with Corsbook, while other might only run for a limited amount of time.
-
3.10 Quizzes
First published on May 12, 2019. Last updated on May 12, 2019.
Course.Cafe presently provides two options for creating practice quizzes.
WP-Pro-Quiz
WP-Pro-Quiz (see left hand side menu) is a more traditional, low-profile tool. It is not being updated, but it still seems to work OK. It has options for various types of questions and allows for feedback for correct and incorrect answers.
H5P
For a more modern look, H5P capability is provided (also see left hand side menu). H5P can take up more page space, but it can be more colorful and interactive.
-
3.11 Embedding Other Content
First published on May 11, 2019. Last updated on May 11, 2019.
When you need to embed content, and the above methods are insufficient, you can try iframe. To use this on Corsbook, use the [iframe][/iframe] shortcode. For example:
[iframe src="https://www.nasa.gov/mission_pages/mars/images/index.html"][/iframe].
This will display the source contents:
.NASA video shown in web version.
Here are some useful parameters for iframe:
- height (examples: height=”50%”, height=”300px”)
- width (examples: width=”100%”, width=”200px”)
Here is another example with lots of parameters.
[iframe class="noprint" height="50%" src="https://www.alexandriarepository.org/wp-content/uploads/20161226131424/HMMExplosiveEruption_12Oct2008_1.mp4" frameborder="0" allow="accelerometer; autoplay; encrypted-media; gyroscope; picture-in-picture;fullscreen" ]Error.[/iframe]You can find additional parameters, such as for sizing, at the iframe site.
There are a few ways you can make iframe better for print and accessibility:
- class=”noprint” after the word iframe will prevent the contents from showing up in the PDF and print media.
- alt=”your visual description” is used after the word iframe or the class statement to tell accessibility-enabled devices what would have been seen in the iframe.
<span class="nodisplay">NASA video shown in web version.</span>can be in text mode used after the enclosing iframe short code to provide a description that will only appear in the PDF and print modes.
-
3.12 Optimizing For Print or Display
First published on . Last updated on October 8, 2019.
Sometimes you might want content to appear either only in print or only on screen. For example, content that cannot be printed, such as videos or quizzes, ideally should be omitted from the print version.
This can be accomplished using shortcodes.
To omit content from the PDF (print version), use:
[noPrint]

Content not to be printed.

[/noPrint]
For content that should only be included in the PDF (print version), use:
[PDFonly]

Content to be printed, but not display on screen.

[/PDFonly]
This is a good way to display alternative content or notices to those that you designate to appear only on screen. Note that these shortcodes only work for blocks of content, and are not designed to be used inline (within paragraphs and sentences). For controlling the display of inline content, you can use <span class=”noPrint”></span> and <span class=”PDFonly”></span>.
-
4 Advanced Styling Tools and Techniques
First published on April 30, 2019. Last updated on August 28, 2019.
Basic Styling Tools and Techniques
It is best to try to first see if you can use any of Corsbook’s existing styling and formatting tools. While editing a course or lesson, you should fully explore the editing toolbar above the content entry field. You can see the function of each tool by hovering over its icon. There are tools for formatting text as headings, with bold and italics, superscript and subscript and with color. There are several indentation and alignment tools. There is a special character menu, and tools for tables, list, links and code. There is a keyboard shortcuts menu with even more options.
Text Mode—Your Doorway to Advanced Styling
Above the content entry field, you can see two editing mode tabs: Visual and Text. You have likely only been working in Visual mode. Text mode is ultimately more powerful, but more challenging to understand and use. Open up one of your more complicated lessons in a new tab or window. Click on the Text tab and examine the contents (but don’t change anything). You might see styling tags such as h2, and . These are HTML content tags. You might also see something like span style=”background-color: #ffcc99;”. This is CSS styling code. CSS stands for Cascading Style Sheets. (See Further Reading below for more information about CSS).
While in Text mode, you can use snippets of CSS code to add styling to your content. You can just use the suggested code below. Or, if you want to write your own CSS code, see Further Reading below. Beware that not all CSS code will work in Corsbook, so test your code in Preview before publishing it. Also, you will need to use CSS inline styling (which is the kind you see in the Text tab mode).
Classes
Classes are a CSS approach to categorize styling. You should enclose them in html tags, such as division <div> or paragraph <p> tags. For example, to style a division, you would enter <div class=”box-gray-w-border”> Your content…<div> in Text mode. Always make sure to enter the closing tag.
Further Reading
The following materials are from W3schools.com. This is an external site, but it contains much useful information.
-
5 Special Topics
First published on . Last updated on February 20, 2021.
To reorder your lessons
- In the Lessons menu, choose Re-Order.
- Drag the Lesson bars into your desired order.
Tips & Troubleshooting
- Embed videos in the following short codes: [iframe class="noprint" src="your source"]] and [[/iframe]. The “scr” refers to the URL of the video, and “class” tells the video not to appear in the print version (which would show up as a blank space).
General Information
Excerpts below taken from WordPress.org.
Showing Authors In The Sidebar
You can list authors in the sidebar. So do so, create an published post for them under post. Likewise, to remove an author from the sidebar authors list, then unpublish or delete any posts that they have. (Posts are not used in the standard version Course.Cafe except for this purpose).
-
6 Editors
First published on May 12, 2019. Last updated on May 12, 2019.
If you are the chief person overseeing your Course.Cafe site, then you likely have Editor level privileges.
Generally speaking, in addition to Author level access, Editors can:
- Edit the Welcome (home) page
- Create additional pages
- Create posts
- Re-order posts
- Edit Categories and other metadata lists (but the Related Course list should generally not be edited)
- See, revise or delete any content on their site (including quizzes)
-
7 Administrators
First published on . Last updated on May 12, 2019.
It may soon be possible to grant some account holders Administrative level access. This would allow you to customize some aspects of your site such as setting a different page to be the home page, and possibly adding new users.
Please contact Course.Cafe if you require administrative access, and the request will be considered on a case-by-case basis. Meanwhile, if you need anything done for which you do not yet have sufficient access, please contact Course Cafe.
-
Appendix: Text Editor Quicktags and Codes
First published on April 30, 2019. Last updated on May 11, 2019.
(Much of the following was written by WordPress.org and is subject to their copyrights and license).
When writing your post, you have the option of using the Visual or Text mode of the editor. The visual mode lets you see your post as is, while the Text mode shows you the code and replaces the WYSIWYG editor buttons with quicktags. These quicktags are explained as follows.
- b – <strong></strong> HTML tag for strong emphasis of text (i.e. bold).
- i – <em></em> HTML tag for emphasis of text (i.e. italicize).
- b-quote – <blockquote></blockquote> HTML tag to distinguish quoted or cited text.
- del – <del></del> HTML tag to label text considered deleted from a post. Most browsers display as striked through text.
- link – <a href=”http://example.com”></a> HTML tag to create a hyperlink.
- ins – <ins></ins> HTML tag to label text considered inserted into a post. Most browsers display as underlined text.
- ul – <ul></ul> HTML tag will insert an unordered list, or wrap the selected text in same. An unordered list will typically be a bulleted list of items.
- ol – <ol></ol> HTML tag will insert a numbered list, or wrap the selected text in same. Each item in an ordered list is typically numbered.
- li – <li></li> HTML tag will insert or make the selected text a list item. Used in conjunction with the ul or ol tag.
- code – <code></code> HTML tag for preformatted styling of text. Generally sets text in a monospaced font, such as Courier.
- more – <!–more–> WordPress tag that breaks a post into “teaser” and content sections. Type a few paragraphs, insert this tag, then compose the rest of your post. On your blog’s home page you’ll see only those first paragraphs with a hyperlink ((more…)), which when followed displays the rest of the post’s content.
- page – <!–nextpage–> WordPress tag similar to the more tag, except it can be used any number of times in a post, and each insert will “break” and paginate the post at that location. Hyperlinks to the paginated sections of the post are then generated in combination with the wp_link_pages() or link_pages() template tag.
- lookup – Opens a JavaScript dialogue box that prompts for a word to search for through the online dictionary at answers.com. You can use this to check spelling on individual words.
- Close Tags – Closes any open HTML tags left open–but pay attention to the closing tags. WordPress is not a mind reader (!), so make sure the tags enclose what you want, and in the proper way.
Workflow Note – With Quicktag buttons that insert HTML tags, you can for example click i to insert the opening <em> tag, type the text to be enclosed, and click /i or Close Tags to insert the closing tag. However, you can eliminate the need for this ‘close’ step by changing your workflow a bit: type your text, select the portion to be emphasized (that is, italicized), then click i and your highlighted text will be wrapped in the opening and closing tags.